• Learn to assess roof damage and choose the right size and material for a tarp
• Step-by-step guide to securely installing a tarp on your roof
• Tips to avoid common tarping mistakes and ensure long-lasting roof protection
Identifying Roof Damage Before Tarping
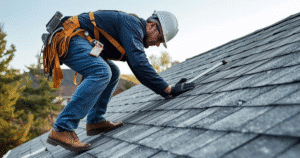
The longevity of your home highly depends on the integrity of its roof, making timely repairs crucial. Spotting the warning signs early on can mean the difference between a quick fix and extensive damage. Look for telltale indicators such as missing shingles, visible holes, or daylight peeking through the attic. Water stains on ceilings or walls also signal that moisture is seeping in and it’s time to act.
In preparation for addressing these issues, it’s important to determine the right size of your tarp. A tarp that’s too small won’t offer adequate protection, while an oversized tarp can be cumbersome and less effective. You’ll need one that covers the area and extends enough to go over the peak, ensuring water runoff. This critical step is the foundation for a secure, temporary solution to avoid further interior and structural damage.
Preventing Worsening Damage
Once you’ve recognized the roof damage, quick measures need to be taken to prevent worsening conditions. Leaving damage unaddressed can lead to more severe consequences, like structural deterioration or mold growth. Rapid response is your best defense against escalating repair costs and preserving the comfort of your home. A robust, well-placed tarp is often your first line of defense, providing a stopgap until professional repairs can be made.
Starting with an assessment and swiftly moving to cover the damage limits exposure to the elements. The right materials and approach can save you time and money. Delaying action isn’t advised as a minor issue can turn into a major one with the next rainstorm. So, gear up with knowledge and get ready to secure your roof with confidence.
Selecting the Appropriate Tarp
When a storm leaves your roof in disarray, a swift and strategic response is essential. Selecting the right tarp requires attention to material robustness and size for effective coverage. Polyethylene tarps are preferred for their resilience against weather and ease of handling, making them an excellent first defense. Make sure that the tarp you choose extends beyond the damaged area and over the roof’s peak, which is critical for diverting water and protecting your home from further damage.
Gathering Your Tarp Toolkit
Before you can secure your tarp, you’ll need the right tools for a safe and successful installation. A reliable utility knife, sturdy measuring tape, quality 2×4 wooden boards, and a hammer are the basics for starting this task. Additionally, don’t overlook personal safety equipment like gloves and a hard hat to protect yourself during the process. For those unanticipated emergencies, knowing you have access to professional services can be a relief; get familiar with the emergency services provided by experts like those at Ecobuild Roofing.
Step 1: Assess the Roof Damage
First, evaluate the extent of damage to determine how large a tarp you’ll need. Ensure it’s large enough to cover the damaged area and extend over the roof’s peak for full protection.
Step 2: Choose the Right Tarp
Select a tarp that is durable and the appropriate size for your roof. Blue polyethylene tarps are commonly used due to their water resistance and affordability.
Step 3: Gather Necessary Materials
Collect all materials needed for the job, including the tarp, utility knife, measuring tape, 2×4 wooden boards, nails, hammer, and safety gear such as gloves and a hard hat.
Step 4: Secure the Tarp’s Edges
Roll one edge of the tarp around a 2×4 board, stretching it out to avoid wrinkles. Secure the wrapped board to the roof with nails, ensuring it’s anchored well.
Step 5: Position the Tarp Over the Damaged Area
Carefully spread the tarp over the damaged section, making sure it extends over the roof’s peak. This will help channel water away from the damaged area.
Step 6: Attach the Opposite End
Wrap the opposite end of the tarp around another 2×4 and securely nail it to the roof as well, ensuring it is tight and flat against the roof surface.
Step 7: Secure the Sides
For additional security, attach 2×4 boards on the sides of the tarp. This helps prevent wind uplift and water from entering under the tarp.
Step 8: Inspect and Reinforce
Inspect your work to ensure the tarp is securely attached. If needed, reinforce any areas with additional nails or boards, paying close attention to the corners and any spots where water could enter.
Common Mistakes to Avoid When Tarping a Roof
When it comes to emergency roof repairs, tarping your roof can seem straightforward. However, even the most hands-on homeowner can make errors that jeopardize the effectiveness of this temporary fix. To ensure your home stays protected until professional help arrives, be aware of these practical errors that frequently occur during the DIY tarping process.
Mistake 1: Underestimating the Damage
Many homeowners fail to assess the full extent of roof damage, resulting in a tarp that’s too small to offer proper coverage. This can lead to persistent leaks and increased damage. To prevent this, thoroughly inspect your roof in daylight, checking for unseen areas of damage that can spread beyond visible issues.
Mistake 2: Choosing a Low-Quality Tarp
Opting for a cheap, flimsy tarp might save money initially but can cost more in the long run if it fails to protect the roof adequately. A heavy-duty, water-resistant tarp is crucial, especially in areas prone to extreme weather. Invest in a good quality tarp – it’s a small price to pay for keeping your home dry.
Mistake 3: Inadequate Securing of the Tarp
A common oversight is not securing the tarp’s edges firmly with 2×4 boards, leading to wind lifting the tarp and water seeping underneath. Properly roll the edges around the boards and nail them down securely, rechecking to ensure no parts of the tarp can flap or bulge.
Mistake 4: Neglecting to Check for Water Pools
After laying the tarp flat, some may forget to look for areas where water can pool. Avoid this by ensuring the tarp is taut and slopes downward to prevent water accumulation, which can cause the tarp to sag and tear, leading to leaks.
Securing the Tarp Correctly
The correct installation of a roof tarp can be the difference between a temporary fix and a damaged, leaking roof that gets worse. Roll one side of the tarp around a sturdy 2×4, stretching it to avoid wrinkles and creating a solid edge to nail down on the roof. Repeat this on the opposite side, ensuring both ends are pulled tight and secure to prevent wind from getting under the tarp and causing further damage.
After Installation: Inspecting and Reinforcing
After you have the tarp in place, it’s crucial to inspect your work carefully. Look for any areas where water might pool or enter, reinforcing those spots with extra nails or even additional 2x4s if necessary. Keep in mind the importance of a thorough inspection, as a properly secured tarp can provide peace of mind until a professional repair can be scheduled through a residential roofing service.


