• Identify early signs of roof leaks, such as water stains or displaced shingles, to prevent extensive damage
• Follow an 8-step guide to diagnose and fix roof leaks, ranging from attic inspection to professional assessments
• Learn common mistakes to avoid during DIY roof inspections to ensure a thorough and effective leak prevention strategy
Understanding the Warning Signs of Roof Leaks
Your home shelters you from the elements, but when your roof begins to fail, it’s crucial to act swiftly. Early detection is your best defense against costly repairs, so recognizing the warning signs of a roof leak is essential. Look for water stains on the ceiling—a classic symptom that often emerges after a storm. These stains may not always be directly under your roof’s problem area due to water traveling along roof panels or lumber.
Indoor Inspections: The First Line of Defense
Venture into your attic with a flashlight to embark on an investigative journey. The attic can reveal the early stages of a leak, such as damp insulation, which could lead to mold or rot if untreated. Following a rainy period, inspect this space for wetness or dark streaks on the underside of the roof deck. This type of evidence points to possible breaches in the roof’s exterior, demanding further examination.
Exterior Checks: Shingles and Fixtures
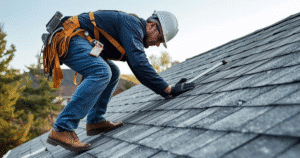
Once outside, your gaze should shift to the condition of your shingles. Displaced or curled shingles can signal that your roof’s waterproof barrier is compromised. Pay particular attention to roof fixtures and their surrounding areas, as damaged flashing can provide a pathway for water intrusion. By proactively surveying these aspects, you equip yourself with the knowledge to prevent minor issues from escalating into major leaks.
Proactive Measures: Maintaining a Secure Roof
Consistent maintenance is key to extending the life of your roof and preventing leaks. Regularly scheduled inspections can catch small problems before they escalate into more significant issues. Knowing what to look for and performing routine checks can save you from the headache and expense of sudden roof damage. Establish a habit of inspecting your roof, particularly before and after severe weather events, ensuring your home stays safe from water intrusion.
When to Seek Professional Help
While your vigilance can catch many potential problems, some situations require professional expertise. If you encounter signs of significant damage or suspect a pervasive roof issue, it’s crucial to consult with experienced roofing specialists. By visiting Ecobuild Roofing’s dedicated service page, you can find comprehensive solutions for all your roofing needs. Remember to reach out swiftly, as waiting too long could escalate the cost and complexity of repairs.
Step 1: Inspect the Attic
Begin your search inside your home by inspecting the attic. Look around for any signs of water penetration or stains on the wood, especially after a heavy rainstorm. This initial step serves as the prime stage for tracing the source of a leak.
Step 2: Examine Roof Vents
On the rooftop, examine any roof vents or fixtures. Most leaks often occur around these protrusions because of worn or damaged flashing. Ensure they are sealed properly to prevent water from seeping in.
Step 3: Check Roof Shingles
Inspect the condition of the roof shingles. If you notice any that are missing, cracked, or curled, they could be the culprit for leaks allowing water to enter the structure of your home.
Step 4: Look at the Flashing
Flashing is essential in directing water away from critical areas of the roof. Inspect the flashing around chimneys, skylights, and valleys for any signs of breakage, rust, or holes that might be the source of a leak.
Step 5: Evaluate the Gutters and Downspouts
Clogged gutters and downspouts can cause water to back up and seep under your roof shingles. Check and clear any debris to maintain a good flow of water away from the roof.
Step 6: Seek Out Algae and Mold
Look for signs of algae and mold growth which can indicate trapped moisture and potential leak areas. These often appear as dark or discolored spots on the roof’s surface.
Step 7: Use Water to Identify the Leak
If you have not yet found the leak, you can mimic rain by using a garden hose to run water over the roof. Have someone inside alert you when they observe water entering the attic, marking the source of the leak.
Step 8: Contact a Professional
If you are unable to locate the leak or it’s inaccessible, it’s wise to contact a professional roofer. They have the expertise and equipment to accurately identify and repair roof leaks, ensuring your home remains safe and dry.
Steering Clear of Common Roof Inspection Missteps
When undertaking a DIY roof leak inspection, it is as essential to know what to avoid as it is to follow best practices. Missteps can lead to missed leaks, further damage, or unnecessary expense. Here we’ll explore common errors many homeowners make during the inspection process and how they can be prevented to ensure a thorough and effective leak assessment.
Mistake 1: Ignoring Attic Ventilation
Not taking attic ventilation into account can lead to misunderstanding the source of moisture. The attic should not only be inspected for leaks but also to confirm that there’s enough airflow to prevent condensation, which can mimic leak symptoms.
Mistake 2: Overlooking Small Leaks
Small leaks might seem insignificant, but over time, they can cause substantial damage. Always mark even the tiniest signs of water penetration in the attic and address them promptly to prevent a minor issue from becoming a major repair job.
Mistake 3: Neglecting the Roof’s Perimeter
Many homeowners focus on the main field of the roof and neglect its edges where leaks often originate. Check the roof’s perimeter thoroughly, including the eaves and rakes, for signs of moisture that can seep into the attic unnoticed.
Mistake 4: Improper Flashing Checks
Faulty installation or inspection of flashing accounts for a significant number of roof leaks. Ensure that the inspection includes a meticulous review of flashing around roof penetrations and intersections, as poor seals here are common leak points.
Mistake 5: Forgetting About Weathering and Aging
Dismissing the effects of weathering and aging on roofing materials can lead to undetected leaks. Examine the overall condition of the roof, looking for aged, broken, or missing components that might allow water ingress.
Mistake 6: Misinterpreting Water Trails
Water may travel far from the entry point before showing signs inside the home. Trace the water trail back to its origin rather than assuming the closest wet spot to your find is where the roof breach occurred.
Mistake 7: Inadequate Gutter Maintenance
Ignoring gutter maintenance can inadvertently cause roof leaks. Ensure that gutters and downspouts are free from debris to prevent water build-up that can lead to backed-up water infiltrating beneath your shingles.
The Role of Expert Roofing Services
Attempting to tackle roof repairs on your own can be a daunting task, and sometimes, it’s best to leave it to the professionals. Ecobuild Roofing offers expertise in diagnosing and fixing complex roof issues that might elude even the savviest DIY homeowners. By seeking professional help, you ensure that your roof leak is not only found but also properly and safely repaired.
Protecting Your Home from Future Leaks
Regular professional check-ups are the cornerstone of a robust, leak-free roof. The specialists at Ecobuild Roofing are well-versed in preventive measures to protect your home against future damage. Involving experts offers peace of mind, knowing your home is safeguarded by knowledgeable and experienced hands.


