• Discover easy steps to clean roof shingles effectively
• Learn to prevent common DIY roof cleaning mistakes
• Understand when to seek professional roof maintenance services
Identifying Roof Shingle Concerns
Before you embark on the journey to refresh and invigorate your roof, it’s essential to be aware of the potential issues you might face. A clean roof not only contributes to your home’s curb appeal but is also crucial for extending the lifespan of your shingles. Dark streaks, moss, and lichen are more than just unsightly; they can signify that your roof is holding moisture, possibly leading to wood rot and weakened shingles. These growths can also impede the natural flow of rainwater off your roof, causing additional stress and potential leaks.
Preparing for the Task
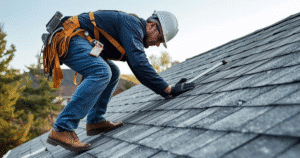
When you notice such concerning signs, it’s time to consider how to clean roof shingles effectively. The first step in the process is to ensure you have all the necessary equipment and safety gear at the ready. This prudence could range from a sturdy ladder for secure access to a gentle yet effective non-corrosive cleaner that gets the job done without damaging your shingles. Remember to prioritize personal safety with gloves, goggles, and slip-resistant footwear because you’ll be working at heights and dealing with chemicals.
Assessing Your Roof’s Condition
A thorough inspection of your roof shingles is paramount before you start the cleaning process. Look for any signs of damage, such as missing or broken shingles, which would need to be addressed to prevent exacerbating the problem. Detecting such issues early on can help avoid a domino effect of damage, saving you time and money in the long run. If you’re unsure about the condition of your roof, consider consulting a professional to avoid turning a simple cleaning into a significant repair job.
Choosing the Optimal Conditions
Timing is crucial when planning a roof cleaning project. The ideal day for tackling this job is one that is both cool and overcast, which helps prevent the cleaning solution from drying too quickly and ensures the chemicals work effectively. Direct sunlight can not only pose a risk to your health but can also cause the solution to evaporate before it has a chance to act on the grime and algae. Always monitor the weather forecasts leading up to your planned cleaning day to ensure optimal conditions are met for a successful cleaning session.
Protecting Your Home’s Surroundings
Before taking action to make your roof shine, remember to protect the greenery and fixtures surrounding your home. Lay down tarps or plastic sheeting to shield your landscaping from any overspray or runoff that may occur during the cleaning process. This step is crucial because even the most eco-friendly cleaning solutions can upset the delicate balance of your garden’s ecosystem. For more in-depth guidance on maintaining your roof’s condition, whether it’s emergency repairs or regular wear and tear, turn to Ecobuild Roofing’s services for expert advice and assistance.
1. **Step 1: Prepare Your Roof Cleaning Equipment**
Gather all the necessary tools and safety equipment for cleaning your roof shingles. This typically includes a ladder, non-corrosive cleaner, a sprayer, a soft-bristle roof brush, and protective gear such as gloves, goggles, and non-slip footwear.
2. **Step 2: Inspect the Roof for Damage**
Before beginning the cleaning process, inspect your roof for any signs of damage. Look for loose, missing, or broken shingles that may need repair. This step is crucial to ensure that the cleaning process does not exacerbate any existing issues.
3. **Step 3: Choose the Right Weather**
Plan to clean your roof shingles on a cool, overcast day to prevent the cleaning solution from evaporating too quickly and to avoid working in direct sunlight, which can be dangerous and less effective.
4. **Step 4: Protect Your Landscaping**
Cover nearby plants and grass with tarps or plastic sheeting to shield them from the cleaning solution. Keep in mind that even eco-friendly cleaners can harm vegetation if not diluted properly.
5. **Step 5: Mix the Cleaning Solution**
Prepare the cleaning solution according to manufacturer instructions. Typically, this involves diluting the cleaner with water in a pump sprayer. A common, gentle cleaning mixture can be made using water and a small amount of chlorine bleach or specially-formulated roof cleaner.
6. **Step 6: Spray the Roof Shingles**
Using the pump sprayer, apply the cleaning solution evenly across the roof shingles, starting from the bottom and working your way up to prevent streaking. Avoid applying too much pressure to prevent damage to the shingles.
7. **Step 7: Scrub the Shingles Gently**
With the soft-bristle brush, gently scrub areas with stubborn algae, moss, or dirt. Be careful not to use excessive force as you can dislodge granules from the shingles, which can reduce their lifespan and effectiveness.
8. **Step 8: Rinse the Roof**
After allowing the solution to sit for the recommended time, thoroughly rinse off the roof with water at low pressure to remove all the cleaning agents. Start from the top, working down to ensure that all residues are washed away.
Common Mistakes to Avoid During DIY Roof Cleaning
When it comes to DIY roof cleaning, enthusiasm is high, but so is the potential for mishaps. It’s essential to approach this task with a strategic mindset to avoid common pitfalls that can lead to more harm than good. Knowing what not to do is as crucial as the cleaning steps themselves, and keeping these errors in mind can save your roof from unnecessary damage and your wallet from unnecessary expenses.
Mistake 1: Ignoring Safety Precautions
Many homeowners underestimate the importance of proper safety equipment. Always use a sturdy ladder, safety harness, and non-slip footwear to prevent falls. Gloves and goggles are also non-negotiable to protect against harsh cleaning chemicals.
Mistake 2: Overlooking Roof Damage Prior to Cleaning
Neglecting to inspect the roof can turn a cleaning session into a disaster. Failing to repair loose or broken shingles before you start can result in further damage. Always conduct a thorough inspection and address any issues before applying cleaners.
Mistake 3: Choosing the Wrong Weather for Cleaning
Attempting to clean your roof on a hot, sunny day can lead to the rapid evaporation of cleaning solutions and inadequate results. It can also increase the risk of heatstroke or dehydration. Aim for a cool, cloudy day for the best cleaning outcome and your safety.
Mistake 4: Damaging Landscaping with Cleaning Solutions
One of the most common oversights is forgetting to protect plants and grass from chemical runoff. Always use tarps to cover nearby vegetation before starting your cleaning project. Remember, even diluted eco-friendly cleaners can harm your garden.
Mistake 5: Using the Wrong Cleaning Mix
Using an incorrect mixture can be ineffective or, worse, damage your shingles. Stick to the recommended dilution ratios and avoid using undiluted bleach or harsh chemicals that can corrode your roofing materials.
Mistake 6: Applying Too Much Pressure on Shingles
Too much water pressure can strip away the protective granules from shingles, reducing their effectiveness and lifespan. When rinsing, use low water pressure and allow the cleaning solution to do most of the work.
Mistake 7: Rough Handling When Scrubbing
Excessively aggressive scrubbing can cause as much damage as neglect. Gentle, circular motions with a soft-bristle brush are key to removing stubborn dirt without damaging the shingle surface.
Mistake 8: Inadequate Rinsing After Cleaning
Leaving any cleaning solution residue can lead to shingle deterioration over time. Ensure thorough rinsing, starting from the top and working your way down to remove all traces of chemicals.
Applying the Roof Cleaning Solution
It’s time to gently restore the cleanliness and allure of your roof. Using a pump sprayer, evenly distribute the diluted solution across the shingles, ensuring you cover all areas without causing any damage. The key is to start at the bottom and carefully work your way up, which prevents the cleaner from creating streaks on the shingles below. Aim for an even application; applying too much pressure can harm the protective granules on the shingles.
Addressing Stubborn Roof Stains
Sometimes, certain areas on your roof might require a little more attention. For spots overwhelmed by persistent algae or moss, use a soft-bristle brush to delicately scrub the surface. This step should be done with care, as vigorous scrubbing can lead to granule loss and, consequently, reduce the lifespan of your roof. If these challenges seem daunting, Ecobuild Roofing’s residential services are readily available to ensure your roof receives the professional care it needs.

