• Recognize signs of wear: Learn how to spot early warnings like cracked shingles and indoor water stains.
• Maintain and prevent: Discover crucial upkeep tips like regular inspections and storm damage assessments.
• Professional vs. DIY: Understand when to consult a professional to ensure the longevity and safety of your roof.
Recognizing the Warning Signs of Roof Deterioration
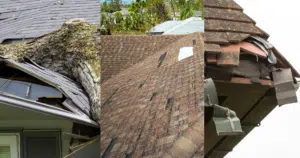
Your roof is your home’s primary line of defense against the elements, and being vigilant about its condition is crucial. Before delving into Step 1: Know Your Roof’s Lifespan, it’s essential to spot the red flags that suggest your roof may be nearing the end of its service life. Cracked or missing shingles, noticeable sagging, and daylight peeking through attic spaces are telltale signs that you need to pay closer attention to your roof’s health. These visual cues are a homeowner’s first indication that it’s time to consider the need for maintenance or an entire roof replacement.
Conducting a Thorough Roof Inspection
Moving on to Step 2: Perform Regular Inspections, it’s important to maintain a bi-annual schedule to assess your roof’s integrity. During these checks, look for cracked shingles, rust on flashing, and growths such as moss or lichen, which can signal more significant issues beneath the surface. These symptoms of wear can often go unnoticed from the ground, so a closer inspection is necessary. It’s about being proactive—not waiting for leaks to appear—because at that point, the damage may have already grown substantially.
Identifying Indoor Signs of Roof Leakage
Indoor inspections play a critical role in early detection, as outlined in Step 3: Look for Leaks in Your Attic and Ceilings. Water stains, streaks on the underside of the roof deck or along walls, or even a musty odor in the attic are clear indicators that water may be compromising your roof. These leaks could spell trouble, as consistent, unchecked water intrusion can lead to structural damage, mold growth, and inefficiency in insulation, pointing to the need for swift action in assessing the potential for roof repair or replacement.
Protecting Your Home Against the Forces of Nature
Encountering a severe storm can be a true test of your roof’s resilience, as detailed in Step 4: Assess Storm Damage. It’s imperative to conduct a detailed inspection following any significant weather events, which can inflict damage that weakens your roof’s structure. Hail can bruise shingles, high winds may tear them away, and heavy snowfalls can place undue stress on the framework. Therefore, if your property has recently weathered a storm, ensure that you assess for any impairments that may necessitate calling in storm damage restoration specialists to return your roof to its optimal condition.
Maintain to Sustain: The Power of Cleanliness and Awareness
A clean roof is more than aesthetics—it’s about preventing the inconspicuous accumulation of damage as mentioned in Step 5: Keep Your Roof Clean. Removing debris and trimming overhanging branches will go a long way in mitigating potential harm; moreover, such maintenance discourages the growth of moss and algae which can erode roofing materials. Climate also plays a significant role in roof maintenance, as elaborated in Step 6: Understand the Impact of Your Climate. Whether it’s the scorching sun or freezing temperatures, the climate in your locale will dictate the care and attention your roof requires, possibly leading to more frequent maintenance checks and interventions to avoid premature roof replacement.
Step 1: Know Your Roof’s Lifespan
Understand the typical lifespan of your roof type. Different materials have varying life expectancies. For instance, asphalt shingles generally last 15-30 years, while metal roofs can last 40-70 years.
Step 2: Perform Regular Inspections
Twice a year, in spring and fall, inspect your roof for signs of damage—cracked shingles, rust spots on flashing, or moss and lichen—which could indicate decay underneath.
Step 3: Look for Leaks in Your Attic and Ceilings
Check your attic or ceilings for water stains and streaks as these are early indicators that your roof needs repairs or replacement.
Step 4: Assess Storm Damage
After severe weather events, inspect your roof for damage. High winds, hail, and heavy snowfall can reduce a roof’s lifespan and might necessitate more frequent replacements.
Step 5: Keep Your Roof Clean
Remove debris and clear overhanging branches to prevent damage and the growth of harmful vegetation that can shorten a roof’s lifespan.
Step 6: Understand the Impact of Your Climate
Be aware that climates with extreme temperature fluctuations can wear down roofing materials quicker, increasing the frequency of replacements.
Step 7: Consider Energy Efficiency and Upgrades
When planning for roof replacement, consider new materials that offer better insulation and energy efficiency which can also extend the period between replacements.
Step 8: Consult With a Professional
Get a professional roofing contractor to inspect your roof and give personalized advice based on your specific situation, location, and type of roofing material.
Introduction to Common DIY Roofing Mistakes
The thought of a DIY approach to roofing is tempting for many homeowners looking to cut costs. However, it’s imperative to be aware that with such complex undertakings, mistakes can be easily made and can often be costly. To safeguard your home and your investment, here are key blunders to avoid during your DIY roofing endeavors.
Common Mistake 1: Ignoring Safety Precautions
Many enthusiastic DIYers underestimate the dangers of roofing work. Failing to use proper safety gear, like harnesses or slip-resistant shoes, can lead to serious injury. Always prioritize your safety by adhering to OSHA guidelines and using the correct safety equipment.
Common Mistake 2: Improper Material Selection
Choosing incorrect roofing materials can lead to premature aging or failure. Materials should be selected based on lifespan, climate, and the structure of the home – for example, using asphalt shingles where metal roofing would be optimal due to climate demands. Before purchasing, consider the guidelines from Step 1 and Step 7, and select materials suited for your roof’s specific needs as well as the local weather conditions.
Common Mistake 3: Overlooking Regular Inspections
The allure of ‘setting and forgetting’ your roof after installation is a misstep that diminishes a roof’s lifespan. As advised in Step 2, regular inspections are crucial for catching early signs of wear and preventing larger issues. Remember, a visual assessment twice a year can save you from unexpected repair costs.
Common Mistake 4: Neglecting Leak Signs
A common error postulated in Step 3 is disregarding the early signs of leaks. Dismissing minor leaks or water stains can lead to significant damage, both structurally and financially. Be vigilant and address any moisture-related issues immediately upon detection.
Common Mistake 5: Incorrect Damage Assessment Post-Storm
After a storm, there’s a tendency to underestimate the extent of the damage, contradicting Step 4. Without proper knowledge, you may miss hidden damages that can compromise your roof’s structure. After events of severe weather, it’s recommended to seek professional inspections to ensure no damage is overlooked.
Common Mistake 6: Inadequate Debris Management
One of the regularly overlooked responsibilities is the removal of roof debris. Falling into complacency can lead to organic growth and blockages, as mentioned in Step 5, which detracts from the integrity and longevity of the roof. Keep your roof free of debris to prevent avoidable damages.
Common Mistake 7: Disregarding The Climate Factor
Failure to account for the local climate when making roofing decisions can have adverse consequences, in stark contrast to Step 6. Material choice and roof design must account for environmental variables such as temperature swings, sunlight exposure, and precipitation patterns. Customize your roofing approach to align with the seasonal challenges specific to your location.
Common Mistake 8: DIY-ing When Professional Help Is Needed
One of the most significant mistakes is not recognizing when a project is beyond personal expertise, against the advice of Step 8. Complex roofing issues require professional assessment and intervention. Recognize when to step back and consult with a professional to ensure that your roof receives the optimal repair or replacement service necessary.
Making Smart Choices for Your Roofing Needs
When it’s time to seriously contemplate roof replacement, Step 7: Consider Energy Efficiency and Upgrades becomes pivotal. Exploring newer, energy-efficient roofing materials not only enhances your home’s thermal performance but could also extend the life of your roof compared to traditional options. Plus, selecting the right materials may result in long-term financial savings on energy bills and potential roof repair costs down the line.
Expert Consultation for Customized Roofing Solutions
Finally, it’s always wise to seek a professional opinion, as emphasized in Step 8: Consult With a Professional. A trusted roofing expert will take into account your personal circumstances, such as the local climate and your specific roofing material, to provide tailored advice. By consulting with professionals from residential roofing services, you ensure a thorough analysis and recommendations that align with your home’s unique requirements and your personal preferences.