• Discover how to select the best shed roof materials for durability and aesthetics in your region’s summer climate
• Follow a step-by-step guide to design, measure, and construct a shed roof that matches your property and withstands the elements
• Learn from common DIY mishaps to avoid errors and ensure your shed roof project is successful and enduring
Identifying Warning Signs
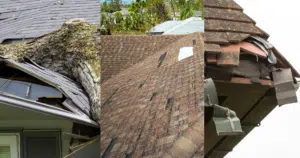
When it comes to maintaining your shed, the roof is an element you can’t afford to ignore. Your first clue to potential trouble might be discovering shingles in your yard after a storm, a clear indication that your shed roof isn’t holding up to the weather. Sagging or noticeable dips in the roofline can be signs of structural issues, such as rotting wood or weakened rafters. Water stains on the ceiling or walls of your shed are often the most conspicuous symptoms of a leaky roof, urging an immediate response to prevent further damage.
Assessing the Impact of Climate
As the summer sun beats down, it can spell trouble for a roof that’s not up to par. Roofing materials that are cracked, curled, or blistered are not just cosmetic concerns; they’re evidence that your roof may not withstand another hot, wet season. Excessive granule loss from asphalt shingles, which may appear as uneven or bare patches, suggests that they’ve reached the end of their protective life. Furthermore, if your shed has become a sanctuary for moss and algae, it’s a signal that moisture retention is compromising your roof’s integrity and it’s time for a thorough evaluation.
Making Way for Renewal
Before you embark on the journey to revitalize your shed roof, clearing out debris like fallen leaves and broken branches is a practical start. This process not only allows you to see the current state of the roofing material clearly but also prevents any organic material from impeding your renovation efforts. Pay close attention to the flashing—the thin pieces of material installed to prevent water from entering at joints—which if damaged could be the source of leaks. Once all problematic signs are assessed and debris is removed, you are set to follow through with Step 1: Choose the Right Materials for a robust and weather-resistant roof over your head.
Embracing Expertise in Material Selection
In pursuit of a robust and reliable shed roof, material selection becomes pivotal. While economic options might be tempting, investing in higher-quality materials ensures longevity and durability in the face of unrelenting summer heat. Consulting with seasoned professionals, such as the team at Ecobuild Roofing, can provide insights into the best materials for your particular needs, taking into account both functionality and style. Harness the wealth of experience available to you and select materials that offer a strong warranty, providing peace of mind and a protective cover over your outdoor investments.
Aligning Design and Durability
Your shed isn’t just a structure; it’s a design statement that should harmonize with its surroundings. A shed roof must be more than just durable; it should also complement the architectural beauty of your property. When it’s time to Design Your Shed Roof, envision a style that accentuates your landscape while standing resilient against June’s summer storms. Opt for a design that aligns structural integrity with aesthetic charm, creating a cohesive and visually pleasing aspect of your outdoor space.
Step 1: Choose the Right Materials
Consider factors such as climate, durability, and aesthetics. Opt for materials that can withstand the summer weather in your region and cater to the aesthetic of your property. Materials like asphalt shingles, metal panels, or wooden shakes are common choices.
Step 2: Design Your Shed Roof
Decide on the roof style that best matches your shed and the surrounding buildings. Common styles for shed roofs include gable, gambrel, and flat designs. Ensure the design adheres to local building codes and fits the structure of your existing shed.
Step 3: Take Accurate Measurements
Measure the area of your shed roof to determine the amount of materials you will need. Accurate measurements are crucial to prevent waste and ensure that all pieces fit together seamlessly during installation.
Step 4: Cut and Assemble the Frame
Using your measurements, cut the rafters and assemble the frame. This will serve as the skeleton of your shed roof. Make sure the frame is secure and reinforced to withstand weight and environmental factors.
Step 5: Install the Roof Decking
Lay down the roof decking on top of the frame. This can be made from plywood or oriented strand board (OSB), which provides a flat surface onto which the roofing materials can be installed.
Step 6: Apply Roofing Felt
Cover the decking with roofing felt, starting from the bottom and working your way up to overlap each layer. This acts as an additional moisture barrier to protect your shed.
Step 7: Attach the Roofing Material
Install your chosen roofing material according to the manufacturer’s guidelines. Be it shingles, metal sheets, or another material, ensure each piece is securely fastened and properly aligned for weatherproofing and visual appeal.
Step 8: Add the Finishing Touches
Inspect your roof for any gaps and seal them with appropriate caulking or sealants. Install drip edges, gutters, and downspouts if necessary to ensure proper drainage during the rainy summer season. Finally, review your roof for any imperfections and address them accordingly.
Navigating Common DIY Pitfalls
Embarking on a DIY shed roofing project can be both rewarding and challenging. As we dive into Step 1: Choose the Right Materials and move through the construction process, being aware of common missteps can save time, resources, and frustration. Below are key errors to avoid, ensuring your roof is built to last through the summer and beyond.
Mistake 1: Underestimating the Importance of Climate Compatibility
Many DIY enthusiasts choose materials based on appearance rather than practicality. In summer, materials must withstand heat and potential storms. To prevent this error, research which materials fare best in your area’s summer conditions and prioritize durability over aesthetics.
Mistake 2: Ignoring Local Building Codes
Without adhering to local codes, there’s a risk of legal complications and safety hazards. When planning your shed roof style, ensure compatibility with regulations to avoid costly fines or redesigns down the line.
Mistake 3: Inaccurate Measurements
Misjudging the size of your roof can lead to material excess or shortages. Invest time in measuring your shed roof area thoroughly; if in doubt, measure twice to avoid any guesswork during the material purchasing phase.
Mistake 4: Overlooking the Need for a Sturdy Frame
A well-built frame is crucial for roof longevity. When executing Step 4: Cut and Assemble the Frame, double-check the strength and alignment of your rafters to ensure they can handle the weight of your chosen materials.
Mistake 5: Installing the Decking Improperly
Decking that’s installed unevenly can lead to water damage and a compromised roof structure. Make sure the decking is level and properly secured to the frame, providing a solid base for your roofing materials.
Mistake 6: Skimping on Roofing Felt
Roofing felt is an essential barrier against moisture. It’s not just an added layer; it’s a necessity. Ensure that it’s applied correctly, with no room for water to slip through.
Mistake 7: Carelessness with Roofing Material Attachment
Even the best materials can fail if not installed properly. Follow the manufacturer’s guidelines closely when installing shingles, panels, or shakes and give special attention to sealing and fastening techniques.
Mistake 8: Neglecting the Details for Proper Drainage
A poorly finished roof can lead to leaks and water damage. Carefully seal all gaps, and do not bypass the installation of gutters and downspouts; these are essential for effectively directing water away from your shed.
By steering clear of these common mistakes, you’ll ensure the integrity and aesthetic appeal of your shed roof, making your DIY project a success.
Accuracy in Every Inch
Taking accurate measurements is the cornerstone of any successful building project, including erecting a functional shed roof. Without precise dimensions, you risk structural inconsistencies that can lead to water pooling or undue stress on materials. For those who are uncertain about this crucial step, seeking assistance from experts at Ecobuild Roofing can be a wise decision to ensure your measurements are on point and your materials are neither over-purchased nor insufficient.
Constructing a Sturdy Framework
The frame is the backbone of your shed roof, demanding careful attention to detail and robust construction techniques. By cutting and assembling the frame with precision, you establish the structural soundness that will support your roof for years to come. A strong frame not only carries the weight of the roofing materials but also provides the first defense against the diverse weather conditions typical of the summer season.