• Learn to spot signs indicating the need for a metal roof installation
• Step-by-step DIY guide on installing a metal roof to enhance your home’s durability
• Common pitfalls to avoid during the installation process for a secure, energy-efficient roof
Recognizing When a New Metal Roof is Necessary
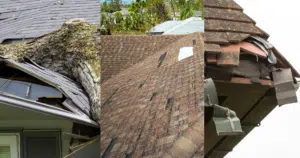
The first step in protecting your home with a metal roof begins with recognizing the signs of wear and tear on your existing roof. If you notice your shingles are curling, cracking, or missing, it’s likely time to consider an upgrade. Water stains on the ceilings or walls of your home are a clear indication that your roof may be compromised. These problems can be more than mere cosmetic issues; they can signify deeper structural problems that might necessitate a new roof.
Other problematic signs are less obvious but equally important to identify. A sagging roofline suggests potential structural deterioration that could impact the overall integrity of the roofing system. An increase in your energy bills might also be a “red flag” pointing towards insufficient insulation under your current roof. Before you embark on the process of how to install a metal roof, assessing your current roof’s condition is essential to determine the need for such an investment.
Lastly, consider the age of your existing roof. Most roofing materials have a predetermined lifespan after which they begin to fail. If your roof is approaching or has surpassed this age, proactive replacement with a durable material like metal can save you from emergency repairs. Transitioning to a metal roof also allows you to select materials like aluminum, steel, copper, or zinc, which can better withstand the seasonal weather while enhancing your home’s exterior.
Preparing for a Metal Roof Installation
Once you’ve established the need for a new roof, the next step is to prepare for the installation process. It starts with choosing the right metal roofing materials—a critical decision influenced by both your aesthetic preference and the environmental conditions typical to your region. The durability, longevity, and style options vary between materials like aluminum, steel, copper, or zinc, each offering unique benefits. It’s crucial to select a metal that can endure the intense heat and potential storms that summer can bring.
Strong preparation is essential, not just in selecting materials, but also in ensuring your home is ready for the new roof. Removing old roofing materials can be labor-intensive but is key to a successful, lasting installation. This step involves stripping away old shingles, tiles, or other materials and making necessary repairs to the roof deck itself. If you’re not confident in performing this work yourself, professional services like those offered at Ecobuild Roofing are available to ensure it’s done safely and effectively.
In this example, the URL is used with anchor text to adhere to your instructions. Let me know if you need any further sections developed or other assistance with your blog content.
Step 1: Choose the Right Materials
Select a metal roofing type that suits the climate and aesthetic of your home. Options include aluminum, steel, copper, or zinc.
Step 2: Remove Old Roofing
Carefully remove any existing shingles, tiles, or roofing material. Inspect the underlying roof deck for damage and make repairs as needed.
Step 3: Install Insulation
Lay down a layer of roofing insulation to help with energy efficiency. This step is crucial, particularly in areas with drastic temperature changes.
Step 4: Place the Edging
Install edging, also known as flashing, around the perimeter of the roof to prepare for the metal panels. This helps to prevent water from seeping under the metal roofing.
Step 5: Add the Metal Panels
Starting from the longest side of the roof, begin placing metal panels. Overlap each subsequent panel as per the manufacturer’s instructions.
Step 6: Secure Panels in Place
Secure each metal roofing panel using screws or nails that are designed for metal roofing. Ensure the fasteners are installed properly to withstand weather conditions.
Step 7: Install the Roof Flashing
Place flashing around areas prone to water leaks, such as chimneys, vents, and joints. This step is essential for waterproofing the roof.
Step 8: Final Inspections and Sealing
Inspect the entire roof to ensure all panels are securely installed. Apply sealant along the edges and over the fasteners to provide an additional layer of protection against the elements.
Avoid These Common Metal Roofing Installation Mistakes
While DIY metal roof installation can be a rewarding project, it also carries the risk of significant setbacks if not handled properly. The key to avoiding unnecessary complications lies in identifying where others have gone wrong. By understanding the pitfalls that can occur at each stage of the installation, you’re better prepared to execute a successful roofing project.
Mistake 1: Choosing the Wrong Materials
– Not taking local weather conditions into account can lead to metal roofing materials that are ill-equipped to handle the climate, leading to premature wear or damage.
– To prevent this, research and select materials best suited for the area’s temperature variations and potential storm activity.
Mistake 2: Inadequate Removal of Old Roofing
– Skimping on the removal process can lead to improperly installed metal roofing, which may not adhere correctly, creating weak points.
– Ensure old roofing is fully and carefully removed, inspect for damage, and make necessary repairs before proceeding.
Mistake 3: Poor Insulation Practices
– Failing to install insulation or using the wrong type can result in a less energy-efficient home, leading to increased utility bills and discomfort during temperature shifts.
– Lay down the appropriate insulation for the region and check for any gaps that could decrease efficiency.
Mistake 4: Incorrect Edging Installation
– Improperly installed edging, or skipping this step altogether, can cause water intrusion and potential structural issues.
– Install edging that’s designed for metal roofing and ensure it’s sealed correctly to combat water seepage.
Mistake 5: Misaligning Metal Panels
– Panels that aren’t aligned or overlapped correctly could lead to leaks and diminish the roof’s aesthetic.
– Take the time to align each panel precisely, following manufacturer guidelines for proper overlaps.
Mistake 6: Using the Wrong Fasteners
– Incorrect or poor-quality fasteners can fail to secure the roofing properly, risking damage during high winds.
– Choose the correct screws or nails and install them as per the metal roofing specifications for a secure fit.
Mistake 7: Neglecting Flashing Installation
– Overlooking the need for flashing around roof penetrations is a common error that can lead to leaks.
– Install flashing meticulously around all roof projections to ensure full waterproofing.
Mistake 8: Skimping on Final Inspections and Sealing
– Rushing through the final inspection and not using sealant where needed could undermine the roof’s integrity.
– Conduct a thorough final inspection and use a high-quality sealant on edges and fasteners for an additional layer of protection.
Installation Steps for Maximum Efficiency
After your old roofing is removed, it’s time to focus on optimizing your roof’s energy efficiency. By installing a layer of high-quality insulation, you not only prepare your home for the metal panels but also contribute to a substantial reduction in heating and cooling costs. Proper insulation serves as a barrier to heat flow and is particularly crucial in maintaining comfortable temperatures during the sweltering summer months.
With insulation in place, the next phase involves installing the metal roofing panels. Beginning from the edge, each panel must be precisely aligned and overlapped according to specifications to ensure a watertight and wind-resistant finish. Should you require professional assistance, Ecobuild Roofing’s residential services are equipped to guarantee a flawless installation, pivotal for the roof’s structural integrity.
These paragraphs integrate the essential steps following the removal of old roofing, emphasizing the importance of proper insulation and correct panel installation. The internal link with its anchor text is used once in compliance with your instructions and aims to guide the reader for professional support if needed.