• Discover the signs of moss growth and assess your roof’s condition
• Follow an effective step-by-step guide on safe moss removal from roofs
• Learn preventative measures to keep your roof moss-free in the future
Identifying the Need for Moss Removal
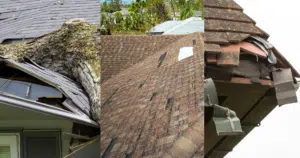
Noticing the subtle onset of moss on your roof can be the difference between simple maintenance and a full-blown roofing project. It starts innocuously, a green tinge here or a small patch there, often preferring the North-facing parts of your roof or areas under frequent shade. Over time, these patches can grow significantly, holding moisture against the shingles and potentially leading to rot or structural damage. Spotting these early signs is key to protecting the integrity of your roof.
The Importance of Regular Inspection
Regularly scanning your roofline for moss isn’t just good practice – it’s a necessary ritual for maintaining your roof’s health. Clumps of green in damp recesses or between shingles are tell-tale signs you shouldn’t ignore. Pay special attention to any area that looks darker or more worn than the rest, as moss can camouflage well with certain roofing materials. A thorough inspection twice a year can reveal these problematic areas before they escalate into more serious issues.
Moss: A Potential Threat to Roof Longevity
Long-term neglect of moss build-up can have consequences that go beyond aesthetics. The persistent dampness caused by moss can degrade roofing materials, while the root systems can lift and displace shingles, leading to leaks. Additionally, moss acts like a sponge during rainfall, retaining water and increasing the weight on your roof structure. It’s not just about curb appeal; it’s about preventing the inevitable damage that comes with unchecked moss growth.
Preparing for Moss Removal
Prior to tackling the moss on your roof, it’s essential to understand the importance of timing. Selecting a dry, overcast day is crucial as it allows the treatment to soak into the moss without swift evaporation or excessive dilution from rainfall. This strategic timing ensures that the moss removal solution has the best possible chance to work effectively. Moreover, an overcast sky minimizes the risk of working under the direct sun, which not only causes discomfort but can also accelerate the drying of cleaning agents.
Equipping Yourself for Safety
It’s imperative to stress the significance of personal safety when operating at heights. Proper protective gear is non-negotiable; secure footgear, durable gloves, and eye protection are the minimum requirements for this task. Your ladder should be sturdy and well-positioned to ensure safe access to the roof. When the preparation is complete, you can proceed confidently, knowing that you’ve taken the necessary precautions to safeguard your well-being, and for additional peace of mind, be sure to explore our full range of roofing services.
Step 1: Assess the Extent of Moss Growth
Start by examining your roof to determine how much moss has accumulated. Look for the areas with the most growth, as these will require extra attention during removal.
Step 2: Choose a Dry, Overcast Day
For safety and effectiveness, choose a day that is dry and overcast to allow the cleaning solution to work without quick evaporation or exposure to high heat.
Step 3: Prepare Your Safety Gear
Gear up with non-slip shoes, gloves, and eye protection. Make sure your ladder is secure, and always practice caution when working on a roof.
Step 4: Apply Moss Removal Solution
Use a moss removal solution appropriate for your type of roofing material. Apply it according to the manufacturer’s instructions to avoid damage to the roof.
Step 5: Gently Scrub Affected Areas
After allowing the solution to sit, gently scrub the moss with a soft-bristle brush. Work downward, as scrubbing upward can lift shingles and lead to damage.
Step 6: Rinse the Roof with Water
Using a low-pressure hose, rinse away the moss and solution. Start from the peak and move downwards, ensuring all debris and chemicals are washed off the roof.
Step 7: Prevent Future Moss Growth
Take preventative measures by trimming overhanging branches to reduce shade and moisture. Consider installing zinc or copper strips along the roof peak, which release metal ions that inhibit moss growth.
Step 8: Schedule Regular Roof Maintenance
Keep an eye on your roof and establish a regular cleaning schedule to prevent moss return. Inspecting your roof once or twice a year can save you from potential long-term damage and costs.
Common Mistakes to Avoid When Removing Moss
In the process of removing moss from your roof, it’s easy to get carried away with the notion that more is better. However, certain commonly-held practices can lead to damage rather than improvement. By understanding these pitfalls, you can ensure a safer, more effective approach to maintaining your roof’s moss-free state.
Mistake 1: Overusing Chemicals
– Often, homeowners believe that using a larger quantity of moss removal solution will yield better results. This can, however, lead to chemical damage to roofing materials and surrounding vegetation. Stick to the recommended guidelines for the best outcome.
Mistake 2: Pressure Washing
– It might be tempting to use a pressure washer to blast the moss away, but high-pressure water can strip away granules from shingles and lead to premature wear. Instead, opt for a gentle hose down after applying a moss removal solution.
Mistake 3: Ignoring Safety Measures
– Overlooking the need for proper safety equipment and precautions is a grave error. Always wear the appropriate gear and ensure that your ladder is secure before performing any roof work.
Mistake 4: Scrubbing Aggressively
– While some elbow grease is necessary, scrubbing too harshly can damage your shingles. Use a soft-bristle brush and a gentle touch to remove the moss effectively without harming your roof.
Mistake 5: Neglecting Seasonal Timing
– Choosing the right time to remove moss is critical. Avoid clear, sunny days where the solution can evaporate quickly, and choose a dry, overcast day to allow the solution to penetrate the moss fully.
Mistake 6: Inadequate Moss Prevention
– After moss removal, failing to take steps to prevent its return, such as trimming overhanging branches or installing metal strips, will cause moss to reappear quickly. Prevention is always better than cure, so take the necessary post-cleaning steps.
By steering clear of these missteps and following the guide provided, you can effectively remove moss and maintain a healthy roof.
Effective Moss Removal Solutions
When it comes to removing moss, the choice of solution is paramount to protect your roofing materials. Eco-friendly options are available that effectively eliminate moss without harming your roof or the environment. It’s vital to follow the manufacturer’s guidelines for application to ensure the longevity of your roof and the safety of your home.
Maintaining the Integrity of Your Roof
Once the cleaning solution has done its work, gently removing the moss is the next step. A soft-bristle brush is your best tool for this, as it allows you to cleanse the shingles of moss without damaging them. Always scrub gently and in a downward direction to maintain the integrity of the roof and avoid lifting or breaking shingles, and for comprehensive care, consider our residential roofing services.