• Recognize when it’s time to replace your roof by identifying warning signs like damaged shingles and leaks.
• Follow a comprehensive step-by-step guide to remove old roofing and install new materials correctly.
• Learn how to choose the right roofing materials and hire a qualified contractor to ensure a durable and safe roof replacement.
Recognizing the Red Flags
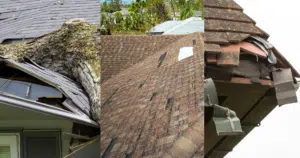
Before diving into the nitty-gritty of replacing your roof, it’s crucial to identify when it’s time for an overhaul. A clear sign that your roof demands attention is when you notice shingles that are missing or visibly damaged, such as those that are cracked, curling at the edges, or buckling. This not only affects the aesthetic appeal of your home but also signals potential vulnerabilities to the elements. Persistent leaks, dark streaks, and water spots on your ceilings or walls are often indicators of a failing roofing system, pointing to the urgent need for an assessment.
The Importance of a Thorough Evaluation
The condition of your roof is not something to be guessed; it requires a deliberate and thorough inspection to ensure your home’s integrity. Take the time to scout for areas that show signs of sagging or deterioration, as these can denote structural issues that may escalate if not promptly addressed. It’s equally important to assess the age of your roof; most shingle roofs have a lifespan of 20-25 years, so if yours is approaching or has exceeded this age, it’s time to consider a replacement. Additionally, inspect the roof from the inside out by checking your attic for any daylight shining through or stains that suggest water damage.
Preparing for a Roof Replacement
Understanding the severity of your roof’s condition is the first step towards making an informed decision about roof replacement. Sometimes a repair might suffice, but if the issues are widespread or the roof is aged, replacement becomes inevitable. When you establish that a replacement is necessary, it’s time to move on to selecting appropriate materials. Keep in mind that materials should complement not only the style of your home but also the local climate, which can significantly impact their lifespan and functionality.
Selecting Your Roofing Materials
When it comes to choosing the most suitable materials for your roof, there’s a myriad of options each with its own benefits tailored to different needs and climates. Factors like durability, energy efficiency, and aesthetic appeal play a significant role in your selection, as they directly affect the long-term satisfaction and protection of your home. For those living in areas with volatile weather, opting for materials that offer resistance to extreme conditions can be a wise decision. It’s also pivotal to consider environmental factors; sustainable materials like recycled shingles or metal roofing not only provide durability but also minimize the ecological footprint of your home.
Finding the Right Roofing Professional
The success of your roof replacement heavily depends on the contractor you choose. Therefore, it’s essential to select a contractor who is not only licensed and insured but also has a reputation for quality work and reliability. Experience in the field and positive feedback from past clients are strong indicators of a contractor’s competence. At Ecobuild Roofing, we understand the significance of trust and quality in roofing projects; to learn more about our services and commitment, feel free to explore our offerings and how we can assist in your roof replacement process.
Step 1: Assess Your Roof
Begin by evaluating the condition of your roof to confirm that a replacement is necessary. Look for signs of significant damage or wear, such as missing, curling, or cracked shingles, persistent leaks, or sagging areas.
Step 2: Choose the Right Materials
Select roofing materials that suit your local climate, budget, and aesthetic preferences. Consider durability, warranties, and whether they meet the local building codes for your area.
Step 3: Find a Qualified Contractor
Research local contractors who specialize in roof replacements. Check their credentials, reviews, and past work. Ensure they are licensed and insured.
Step 4: Remove Old Roofing
Your contractor will remove the old shingles, underlayment, and any damaged decking. This process might uncover additional damage, so be prepared for possible unforeseen repairs.
Step 5: Install New Decking if Necessary
Inspect the roof’s decking. If it’s compromised, your contractor will replace the wood to ensure a solid foundation for the new roofing materials.
Step 6: Install Underlayment and Shingles
Apply a water-resistant underlayment to protect from moisture, followed by the installation of new shingles. This process follows a specific pattern, starting from the roof’s edge moving upwards.
Step 7: Add Flashing and Sealant
Install flashing around roof features like the chimney, vents, and joining points to prevent water ingress. Use sealant to secure the flashing and defend against leaks.
Step 8: Clean Up and Final Inspection
After the installation, the area will be cleaned of debris and leftover materials. A final inspection is done to ensure the roof replacement meets local building standards and your satisfaction.
Common Pitfalls in DIY Roof Replacement
When homeowners tackle roof replacement without professional help, they often commit errors that could lead to more damage and increased costs. From misjudging the scale of the project to using improper materials, these missteps can significantly undermine the roof’s integrity and safety. This section outlines critical mistakes to avoid and how to sidestep them to ensure your roof replacement is a success.
Mistake 1: Underestimating the Project Scope
Many DIYers fail to realize the complexity and dangers of roof replacement. Without proper assessment, they might overlook critical damage or necessary precautions, leading to incomplete or unsafe work. To avoid this, conduct a thorough evaluation or consult a professional to understand the full extent of the job.
Mistake 2: Choosing Incorrect Materials
Selecting roofing material solely based on cost or aesthetics can lead to premature wear or failure. Materials must be suited to the climate and building codes of your area. Always research or consult experts to select materials that offer the right balance of durability, cost-effectiveness, and compliance with local regulations.
Mistake 3: Improper Installation Techniques
Roofing requires precise installation methods, and common DIY mistakes include improper nailing and shingle alignment. These errors lead to leaks and reduced lifespan of the roof. Follow manufacturer guidelines carefully or consider hiring a professional to ensure the correct application of each material.
Mistake 4: Overlooking Safety Measures
DIY roofers often neglect safety measures, risking falls and injuries. Always use safety gear like harnesses and non-slip footwear, and work with a buddy system. Safety should be a top priority in any roofing project, regardless of scale.
Mistake 5: Poor Planning for Weather and Timing
Attempting a roof replacement without accounting for the weather can be disastrous. Wet conditions can make the roof slippery and unclear forecasts can lead to water damage in the mid-project. Always check the weather in advance and plan your project during a clear, dry season.
By understanding and avoiding these pitfalls, you can ensure a safer and more effective roof replacement. Whether you decide to go the DIY route or hire a contractor, knowledge is your best defense against common roofing errors.
Removing Your Old Roof
The process of tearing off your existing roof is one that should be handled with utmost caution and precision. Old shingles, underlayment, and potentially damaged decking will be methodically stripped away to pave the way for your new roof. It is during this stage that any unforeseen issues, such as hidden water damage or weakened structures, are likely to be discovered, marking them for immediate attention.
Preparing for New Installation
Once your old roof has been properly removed, the next critical step is the inspection and preparation of the roof decking. If the decking is compromised or damaged, new, sturdy panels will replace it to ensure a secure base for your new roof. For detailed information on how this process fits into the larger picture of restoring your home’s protection, our storm damage restoration services provide a comprehensive look into the careful steps taken to maintain structural integrity.